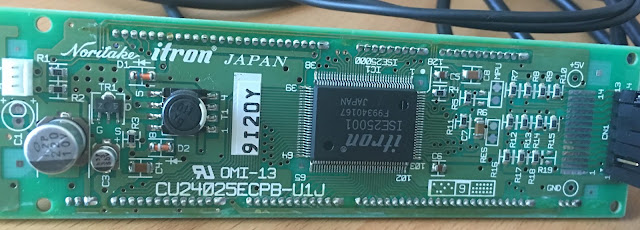
The model VFD I got comes with its own driver board so its super easy just to send it the text you want over the parallel lines and the VFD driver takes care of the rest. Lots of Noritake's models state that there is a 5 or 6 pin serial port on the driver board allowing you to use sync/async serial instead of parallel. Well I must have been the unlucky one since apparently all I have is a parallel connection (on the far right of the above image). Luckily thats no big deal because Noritake's documentation and sample files make life quite easy.
There are several parts to getting this VFD to work.
- Hookup
- Downloading the Noritake Arduino Library
- Uploading the sample code
- Enjoying the VFD
The Hookup
Hookup was relatively easy once you found the proper documentation to tell you what the pins are.
The only thing even close to a datasheet for my exact model of VFD was off of DigiKey's website: https://media.digikey.com/pdf/Data%20Sheets/Noritake%20PDFs/CU24025ECPB-U1J.pdf
There you can see the pin layout towards the bottom of the page:
If you are using the sample code outlined later in this post, the connections for the parallel connector to the Arduino are below:
VFD -> Arduino Pin
1 (GND) > GND
2 (VCC) > VCC
3 (Not Connected)
4 (RS) > 9
5 (RW) > 10
6 (E) > 11
7 (D0) > 12 //Originally it was 0 but it causes problems with uploading the sketch, so I switched it.
8 (D1) > 13 //Originally it was 1 but it causes problems with uploading the sketch, so I switched it.
9 (D2) > 2
10 (D3) > 3
11 (D4) > 4
12 (D5) > 5
13 (D6) > 6
14 (D7) > 7
Now that you have it hooked up, double check your connections so it looks like this:
Downloading The Library
Noritake provides an Arduino library at https://www.noritake-elec.com/user/download?id=Arduino_Noritake_VFD_CUU&category=10&type=cuu
Download the Zip, add it to your Arduino Libraries by going to Sketch > Include Libraries > Add .Zip Library. Once I did that it didn't show up in the menu listing of my libraries but did show up if you clicked "Manage Libraries" as "cuu".
Uploading The Sample Code
Below is the code I used/modified to get it working for my board. I only changed the mode I was using and the pin configurations but other than that its basically the same as the sample code Noritake provides on their QuickStart guide:
#include <CUU_Interface.h>
#include <CUU_Parallel_I80.h>
#include <CUU_Parallel_M68.h>
#include <CUU_Serial.h>
#include <Noritake_VFD_CUU.h>
/*VFD > Arduino
1GND > GND
2VCC > VCC
3NC
4RS > 9
5RW > 10
6E > 11
7DBO > 12
8DB1 > 13
9DB2 > 2
10DB3 > 3
11DB4 > 4
12DB5 > 5
13DB6 > 6
14DB7 > 7
 */

//Changed D0, D1 from Arduino0,1 to Arduino12,13 so it will upload the sketch fine.
//Apparently it cant upload if there is anything connected to 0,1 on upload :/
CUU_Parallel_M68 interface(9,10,11, 12,13,2,3,4,5,6,7);//RS,WR,RD,D0-D7

Noritake_VFD_CUU vfd;

void setup() {
  _delay_ms(500);      // wait for device to power up
  vfd.begin(20, 2);    // 20x2 character module
  vfd.interface(interface); // select which interface to use

  vfd.CUU_init();      // initialize module

  vfd.print("O HAI THERE :D"); // print some text
}

void loop() {
}
Enjoying The VFD
And enjoying it, I am. Noritake made it relatively easy to get up and running quite quickly, so I greatly appreciate that.
Now the next step is to modify the code so it takes input from a serial connection so I can control it using a python script. Maybe a retro twitter scroller? I dunno :D
References For Reference :)
Arduino QuickStart Guide: https://www.noritake-elec.com/support/design-resources/support-guide/arduino-code-library-quick-start-guide
Noritake Overview: http://www.noritake-itron.com/NewWeb/GVFD/Overview/Overview.asp
Cu-U Application Notes: https://noritake-elec.com/includes/documents/brochure/CU-U_Application_Note.pdf


No comments:
Post a Comment